
Thanks Jim, it really feels like it's coming together and if course it's driving much better too. Glad to hear you're enjoying the write up.Alpina Jim wrote:A good write up James and great to see your enthusiasm to bring your car up to a high standard. Looking forward to following this thread.
Good luck,
B3 3.3 Coupe - A little TLC
Currently:
1992 Alpina B2.5 #026, Lagoon Green with Parchment Cloth
Previously:
2013 BMW M135i 3dr, Mineral Grey with Red Leather
2001 Alpina B3 3.3 Coupe #170, Orient Blue with Grey Leather
2006 Z4MC, Silver Grey with Red Leather
2001 E46 330i Sport, Silver with Red Leather
1997 E36 323i SE Touring, Calypso Red with Grey Cloth
Following on from the recent replacement of the front dampers I had still not found a successful way of tightening up the strut top nut. This one:
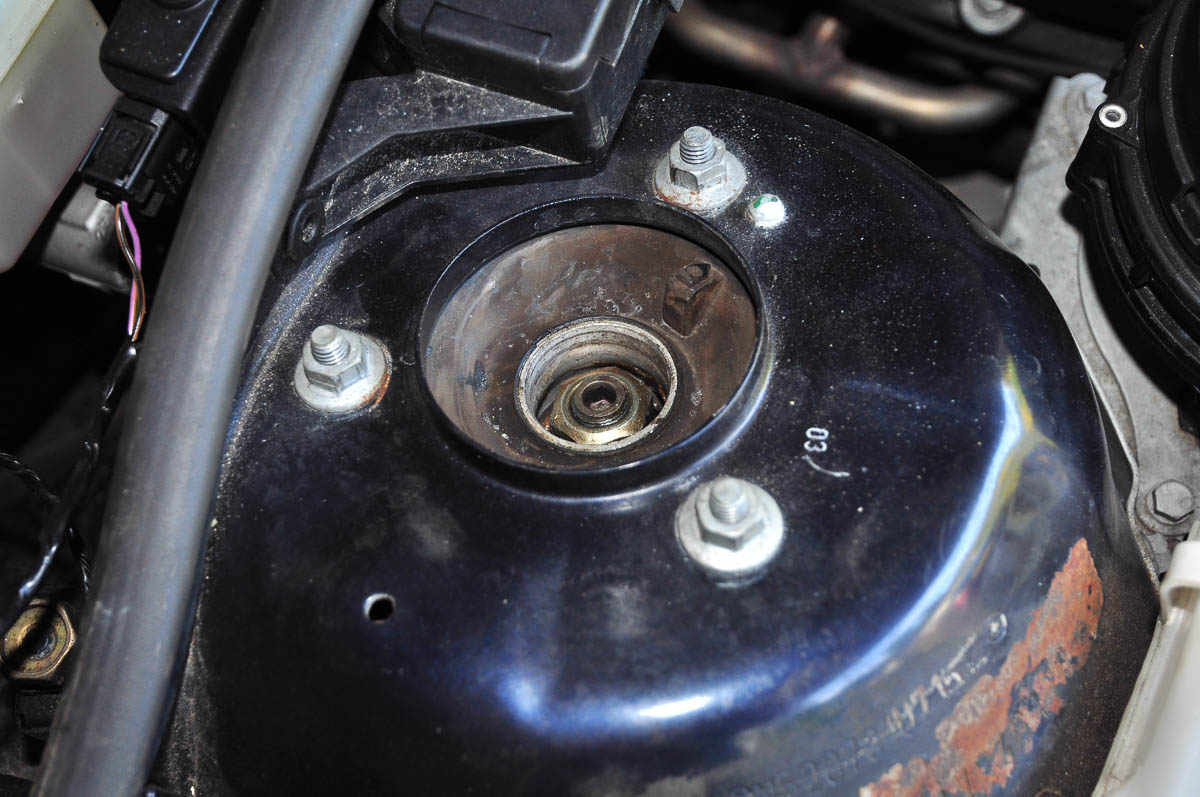
This has been a problem before, notably when I did the dampers on my 944 and once again a 22mm off set spanner doesn't fit. In fact I don't think I've actually ever used this spanner for this very reason.

So I ordered a 22mm oxygen sensor socket, since having a cut out it allows for the use of an allen key. So when it arrived I went straight out to the car only to find that it also doesn't fit . I suppose being made from an impact socket means the wall thickness is too great.
Desperate to actually get on and drive the car I used my Makita impact driver to tighten it, despite my best intentions, but it can only impart 20ft lbs, or less than half the recommended amount so the search was for a proper solution continued.
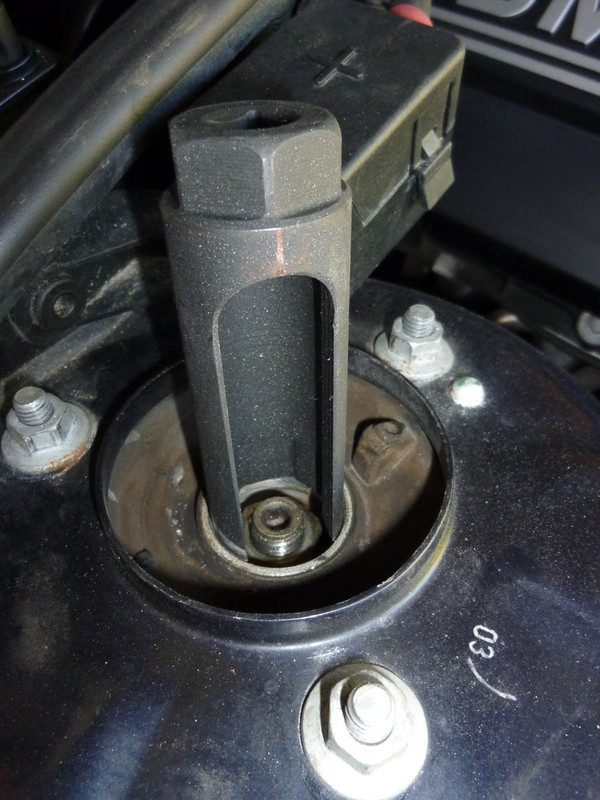
Eventually I found something online, with free postage too and I'm pleased to say it fits perfectly

I've now been able to torque up both sides to the correct 47 ft lbs, and have solved an issue that has not only caused me grief here, but also on previous cars.
If any of you want your own I bought it here:
http://www.consolidatedtools.com/epages ... /SYK015103
No affiliation, it's just the only place I could find selling one. They occasionally turn up on eBay too.
This has been a problem before, notably when I did the dampers on my 944 and once again a 22mm off set spanner doesn't fit. In fact I don't think I've actually ever used this spanner for this very reason.
So I ordered a 22mm oxygen sensor socket, since having a cut out it allows for the use of an allen key. So when it arrived I went straight out to the car only to find that it also doesn't fit
Desperate to actually get on and drive the car I used my Makita impact driver to tighten it, despite my best intentions, but it can only impart 20ft lbs, or less than half the recommended amount so the search was for a proper solution continued.
Eventually I found something online, with free postage too and I'm pleased to say it fits perfectly
I've now been able to torque up both sides to the correct 47 ft lbs, and have solved an issue that has not only caused me grief here, but also on previous cars.
If any of you want your own I bought it here:
http://www.consolidatedtools.com/epages ... /SYK015103
No affiliation, it's just the only place I could find selling one. They occasionally turn up on eBay too.
Last edited by James_G on Mon Jan 18, 2021 2:03 am, edited 1 time in total.
Currently:
1992 Alpina B2.5 #026, Lagoon Green with Parchment Cloth
Previously:
2013 BMW M135i 3dr, Mineral Grey with Red Leather
2001 Alpina B3 3.3 Coupe #170, Orient Blue with Grey Leather
2006 Z4MC, Silver Grey with Red Leather
2001 E46 330i Sport, Silver with Red Leather
1997 E36 323i SE Touring, Calypso Red with Grey Cloth
1992 Alpina B2.5 #026, Lagoon Green with Parchment Cloth
Previously:
2013 BMW M135i 3dr, Mineral Grey with Red Leather
2001 Alpina B3 3.3 Coupe #170, Orient Blue with Grey Leather
2006 Z4MC, Silver Grey with Red Leather
2001 E46 330i Sport, Silver with Red Leather
1997 E36 323i SE Touring, Calypso Red with Grey Cloth
-
Alpina Jim

- ALPINA

- Posts: 1450
- Joined: Wed Nov 12, 2003 10:34 pm
- Location: Near Portsmouth
In the past this has worked. Use the impact driver to get past the lock on the lock nut and then tighten by hand, but it was still spinning in this instance. Never thought about holding the socket that way, but then I don't have any mole grips and I doubt I could hold it by hand.simon13 wrote:Halfords 22mm sockets fit no problem decent one. Usually the weight of the car itself is enough to do them up.
If not hold the socket by hand and use a long allen key and tighten that way until you can repeat above.
your way is better but if your in a pickle
Alas I sold my angle grinder at a car boot sale a few years ago, but I would definitely have done this if I still had it.Alpina Jim wrote:Last time I used an angle grinder to cut a hole in an old spark plug socket and it worked a treat and saved me hunting around for one. It must be the engineer in me trying to escape at times.
Currently:
1992 Alpina B2.5 #026, Lagoon Green with Parchment Cloth
Previously:
2013 BMW M135i 3dr, Mineral Grey with Red Leather
2001 Alpina B3 3.3 Coupe #170, Orient Blue with Grey Leather
2006 Z4MC, Silver Grey with Red Leather
2001 E46 330i Sport, Silver with Red Leather
1997 E36 323i SE Touring, Calypso Red with Grey Cloth
1992 Alpina B2.5 #026, Lagoon Green with Parchment Cloth
Previously:
2013 BMW M135i 3dr, Mineral Grey with Red Leather
2001 Alpina B3 3.3 Coupe #170, Orient Blue with Grey Leather
2006 Z4MC, Silver Grey with Red Leather
2001 E46 330i Sport, Silver with Red Leather
1997 E36 323i SE Touring, Calypso Red with Grey Cloth
I've given myself this weekend off from the car, but last weekend I was back under it. At the time the front was sporting new dampers, new lower arms and new rear bushes so was feeling good. The rear was still on the original Alpina dampers but I had taken advantage of some preferential discounting a few weeks before and had bought the matching rear dampers, so it was time to fit them.
Once again the breaker bar is set to work to undo the bottom damper bolt. Not sure how I ever worked on cars without this - essential tool I'd say.

Once undone I thought I'd get it up on stands but my jack is too short to get to the rear central jacking point while still allowing you to pump the handle. So I had to do it the old way. Next step was to loosen the top mount and in this case it's hidden under this sound proofing behind the carpet. Given how easily it tears it was clear mine has never been touched.
Pulling it back exposes the top mount, with its two 13mm bolts.

Once they were loosened I went back under the car to pull the lower bolt out. Here's the original damper looking every day of its 12 years

And the top mount up in the arch

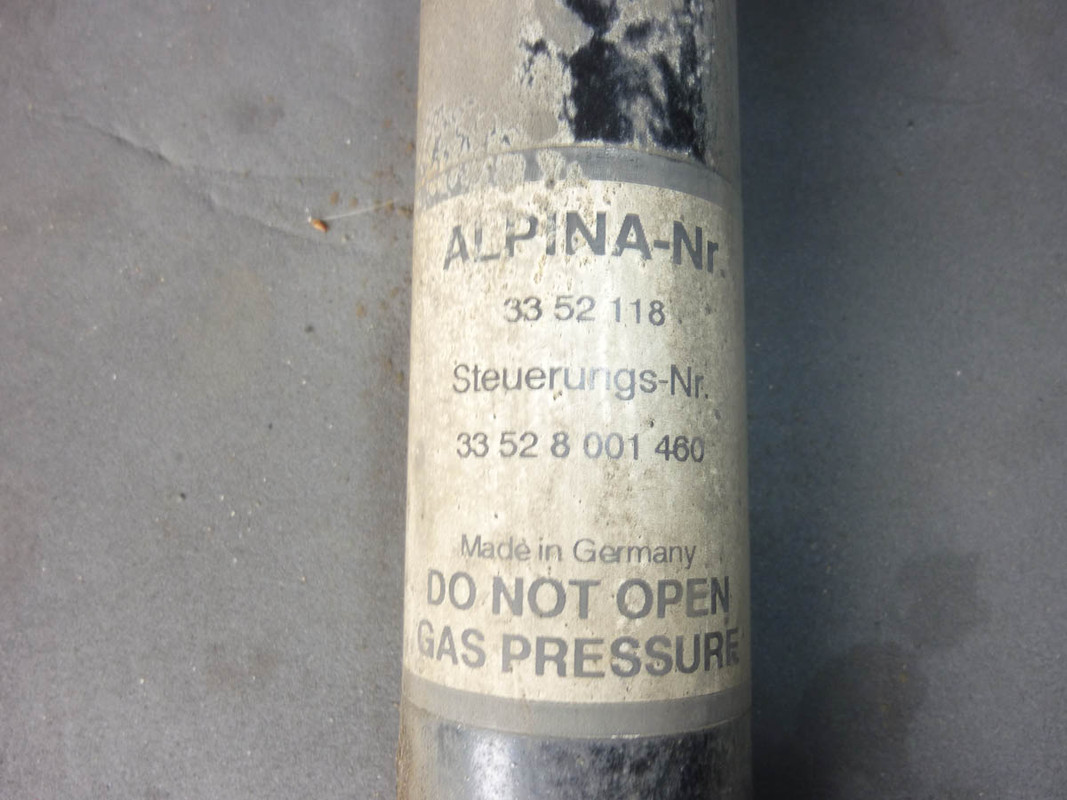
And that's it really, three bolts and it's out. Here it is and nice to see the Alpina logo, not so nice to see the rust
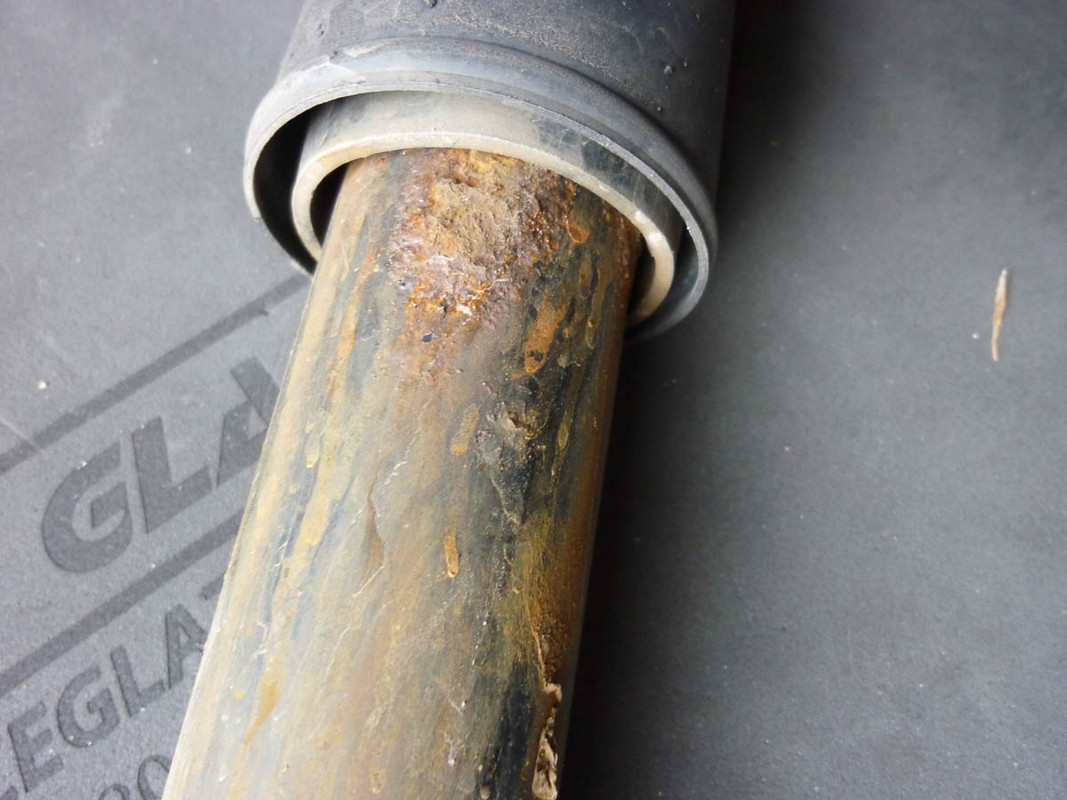
The rust continues when look back up at the top mount. In theory I should have replaced these, but in a rare case of poor planning I hadn't thought about it, so I had to refit them.

Process for removal is easy though, hold the damper shaft with a small spanner (6mm I think) and wind off the nut with a 16mm

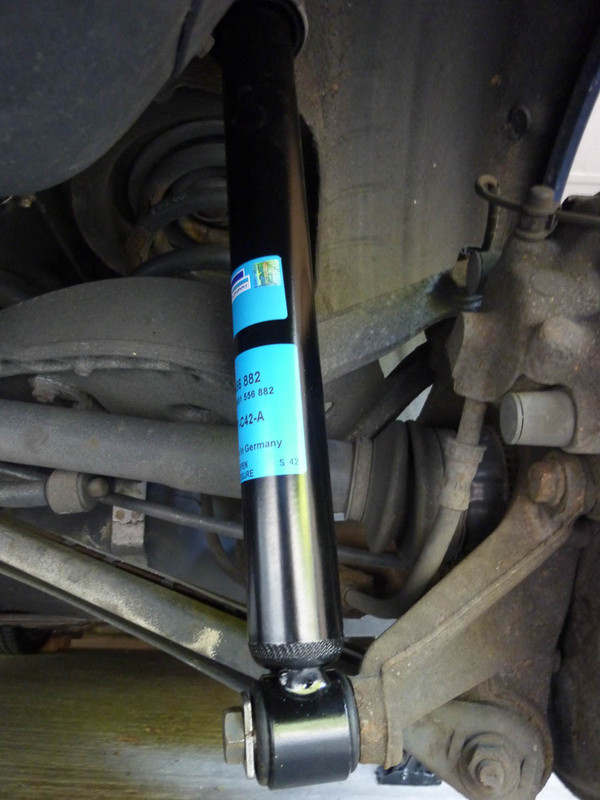
And here's the old one alongside the new one, which is looking nice and clean and comes supplied with a nice new lock nut.


And all made up with the top mount

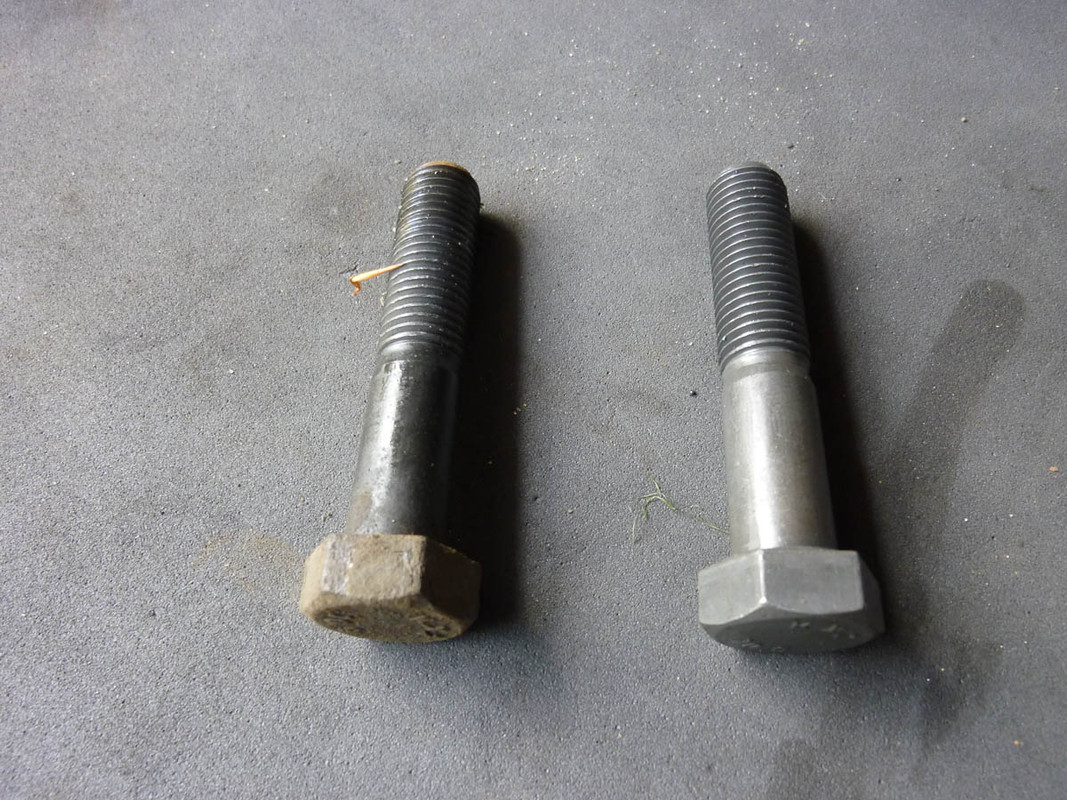
I'd ordered in new lower damper bolts assuming that they would be as rusty as those on the front, but actually it was totally unnecessary, as they were in great condition. But I couldn't return the bolts that I'd ordered so I went ahead and fitted them anyway. New one on the right, obviously.
Once everything was in it was just a case of torqueing up the top and bottom nuts and dropping the car down.

And here it is, all finished up. Definitely one of the easiest things I ever had to do on a car. I think it took longer to remove the carpet trim than it did to fit the dampers themselves.
Next job, and hopefully the last, is going to be the rear trailing arm bushes. Once done I can get a full alignment and start doing some proper miles in it.
Once again the breaker bar is set to work to undo the bottom damper bolt. Not sure how I ever worked on cars without this - essential tool I'd say.
Once undone I thought I'd get it up on stands but my jack is too short to get to the rear central jacking point while still allowing you to pump the handle. So I had to do it the old way. Next step was to loosen the top mount and in this case it's hidden under this sound proofing behind the carpet. Given how easily it tears it was clear mine has never been touched.
Pulling it back exposes the top mount, with its two 13mm bolts.
Once they were loosened I went back under the car to pull the lower bolt out. Here's the original damper looking every day of its 12 years
And the top mount up in the arch
And that's it really, three bolts and it's out. Here it is and nice to see the Alpina logo, not so nice to see the rust
The rust continues when look back up at the top mount. In theory I should have replaced these, but in a rare case of poor planning I hadn't thought about it, so I had to refit them.
Process for removal is easy though, hold the damper shaft with a small spanner (6mm I think) and wind off the nut with a 16mm
And here's the old one alongside the new one, which is looking nice and clean and comes supplied with a nice new lock nut.
And all made up with the top mount
I'd ordered in new lower damper bolts assuming that they would be as rusty as those on the front, but actually it was totally unnecessary, as they were in great condition. But I couldn't return the bolts that I'd ordered so I went ahead and fitted them anyway. New one on the right, obviously.
Once everything was in it was just a case of torqueing up the top and bottom nuts and dropping the car down.
And here it is, all finished up. Definitely one of the easiest things I ever had to do on a car. I think it took longer to remove the carpet trim than it did to fit the dampers themselves.
Next job, and hopefully the last, is going to be the rear trailing arm bushes. Once done I can get a full alignment and start doing some proper miles in it.
Last edited by James_G on Mon Jan 18, 2021 11:46 am, edited 1 time in total.
Currently:
1992 Alpina B2.5 #026, Lagoon Green with Parchment Cloth
Previously:
2013 BMW M135i 3dr, Mineral Grey with Red Leather
2001 Alpina B3 3.3 Coupe #170, Orient Blue with Grey Leather
2006 Z4MC, Silver Grey with Red Leather
2001 E46 330i Sport, Silver with Red Leather
1997 E36 323i SE Touring, Calypso Red with Grey Cloth
1992 Alpina B2.5 #026, Lagoon Green with Parchment Cloth
Previously:
2013 BMW M135i 3dr, Mineral Grey with Red Leather
2001 Alpina B3 3.3 Coupe #170, Orient Blue with Grey Leather
2006 Z4MC, Silver Grey with Red Leather
2001 E46 330i Sport, Silver with Red Leather
1997 E36 323i SE Touring, Calypso Red with Grey Cloth
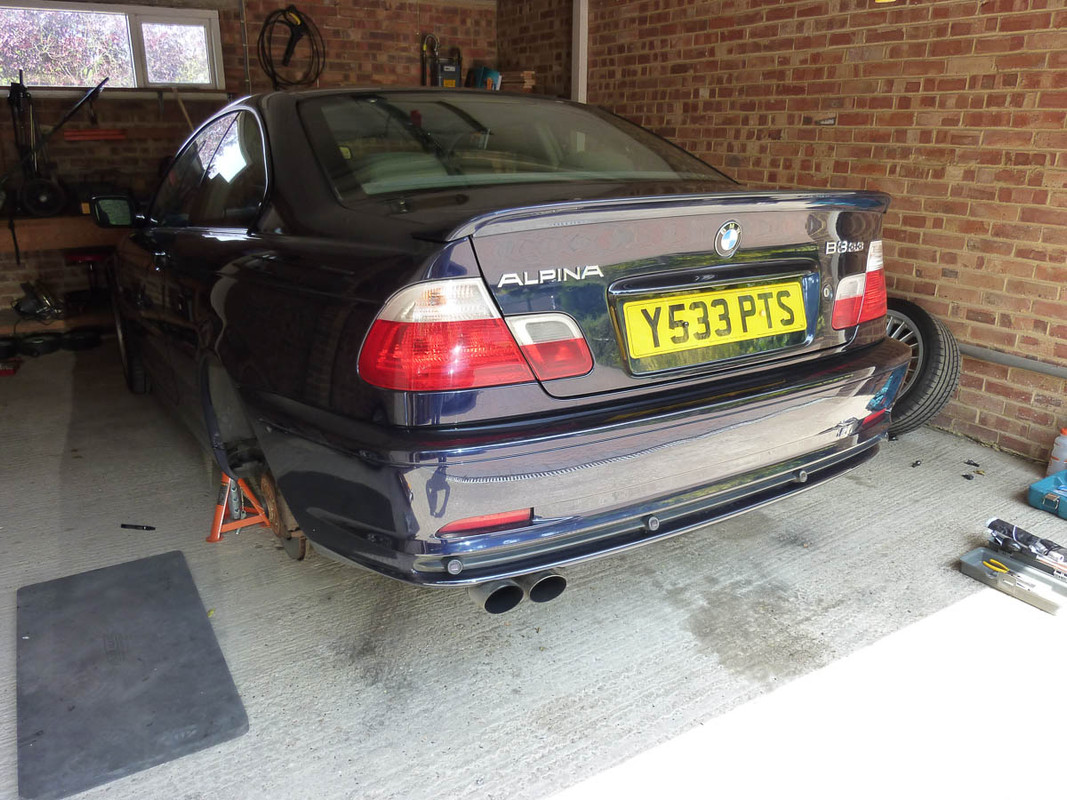
So here we are, the last (planned) job for my Alpina, replacing the rear trailing arms bushes.
I couldn't decide whether to go with OEM, M3 spec OEM or Powerflex. When I spoke to my local dealer and they told me that boggo OEM ones come as a "kit" with all new bolts for less than M3 spec OEM ones without (about £44) I decided that was the way to go. Others on here have refitted OEM too and had good things to say, so I was happy with that.
First up then is to get the rear of the car on axle stands. This is surprisingly stressful as the diff carrier that's used as the jacking point is a long way inboard and my regular jack was too short, so I had to jack from the sides to give myself some clearance first. Anyway, here she is, wheels removed.
At this point I had already done the driver's side, so I'm showing the passenger side now that I know what I am doing. The rear trailing arm bush sits at the front of the trailing arm, which is in front of the disc in this photo

Running along the trailing arm on this side is the brake wear sensor and this must be unclipped before anything else. Luckily it has a connector tucked away in a black box
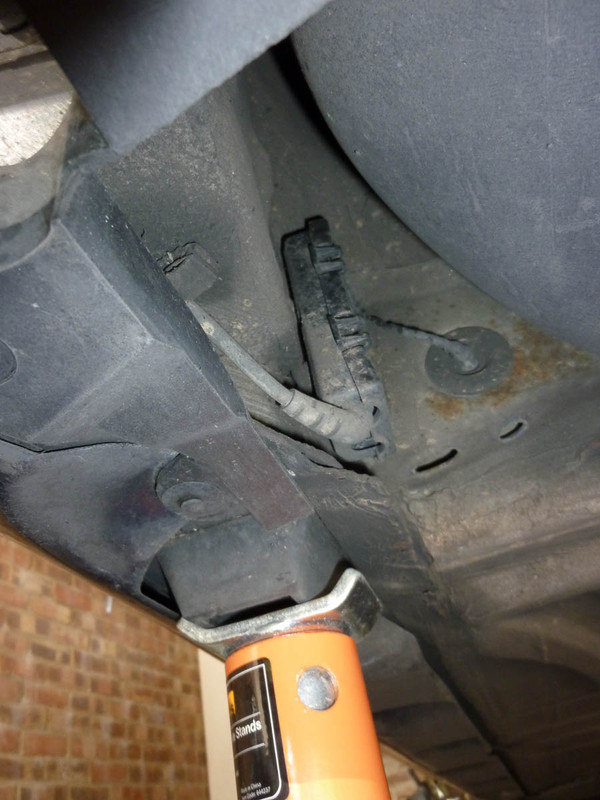
Also in the way is a plastic air deflector (true purpose unknown) but it's held in only by expanding plastic rivets, which can be easily dealt with.
Once removed, it's a simple job to get on with removing the three bolts to drop the cage. Before doing that though I made sure I marked the location of the cage using a permanent marker.

In my case the three bolts came out easily (others have reported bolts shearing off ) and the cage dropped down easily supported by a trolley jack. Once down it's time to undo the central pivot bolt, which requires a decent size breaker bar (tightening torque is 110nm - similar to wheel nuts)

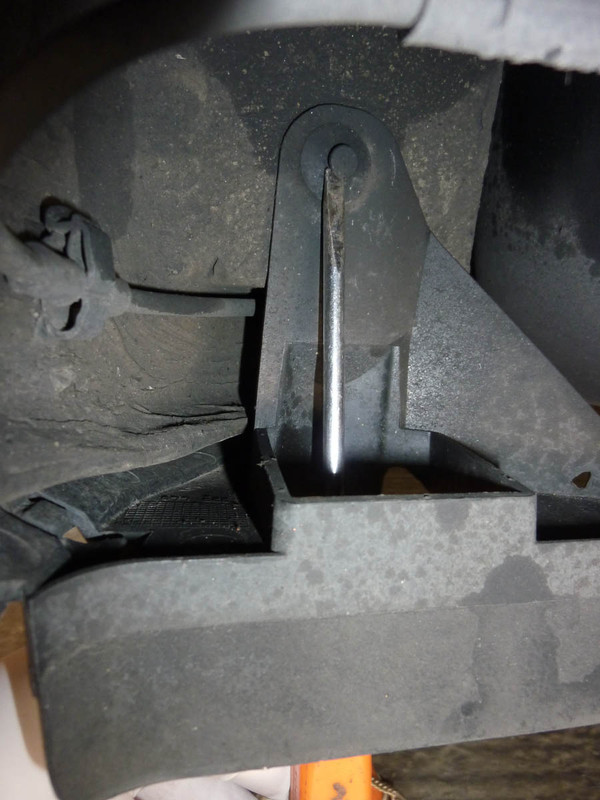
Leaving this
I had trouble getting the arm low enough, but by removing the rear damper bolt, levering the arm down with the screwdriver in the picture and wedging with some blocks of wood I got it where it needed to be.

So time to get the old bushing out. I had already bought a removal tool from eBay and while this is optional, it has made the job so much easier. I assembled the tool in the correct orientation and got my cordless impact driver with a deep 19mm socket in on the action.
Ready to go

Two minutes later

You could do it using a hand ratchet, but if you have the tools why not use them I say. At this point the old busing is within the black section of the tool. Once removed, a quick visual inspection shows that it's not in bad shape and is date marked 2002. The ones I am fitting are date marked 2011, so I'm confident these bushes have been changed before since my car is a late 2000 build. This probably explains the bolts being easy to undo. Anyway, old bushing looks like this:

And the bushing carrier looks like this, once cleaned up with some emery paper

As mentioned, the OEM bushes come with all new bolts, so here's what you get per side for your £44 or so.

No point hanging around, so I put copper slip in the bushing carrier and on the outside of the bushing,

Then I reconfigure the tool for installation, and get the impact driver on it again.

A few minutes later, it's all in. This one went straight in, but the otherside went in lopsided initially, so I had to back it out and try again

So now it's a case of re-installing everything and lining it all up. One issue with dropping the arm this low is that the spring unseats, so you have to make sure that's in the right place when you get things back together.

It's a bit of a hassle lining it all up as you are lying in your back holding the arm (and all the brakes etc) while trying to tighten some bolts. But a little patience and it was all back together

I then have the job of jacking the car up, removing the stands and gently lowering the car down, which I hate, but it goes without a problem.

Final thing to do was to torque the lower damper bolts with the car back on the ground (so as to ensure the correct preload apparently).
Next step is the full alignment that's already booked in for next week, but I took it for a quick 5 mile journey and already things feel much more composed. I've tried my best to keep the settings right, but I won't be driving it until the alignment is done, so as to not accelerate any tyre wear.
So that's it for all things mechanical ( I hope) leaving me to concentrate on tidying up the bodywork and the wheels. Thanks for reading.
Cheers
James
I couldn't decide whether to go with OEM, M3 spec OEM or Powerflex. When I spoke to my local dealer and they told me that boggo OEM ones come as a "kit" with all new bolts for less than M3 spec OEM ones without (about £44) I decided that was the way to go. Others on here have refitted OEM too and had good things to say, so I was happy with that.
First up then is to get the rear of the car on axle stands. This is surprisingly stressful as the diff carrier that's used as the jacking point is a long way inboard and my regular jack was too short, so I had to jack from the sides to give myself some clearance first. Anyway, here she is, wheels removed.
At this point I had already done the driver's side, so I'm showing the passenger side now that I know what I am doing. The rear trailing arm bush sits at the front of the trailing arm, which is in front of the disc in this photo
Running along the trailing arm on this side is the brake wear sensor and this must be unclipped before anything else. Luckily it has a connector tucked away in a black box
Also in the way is a plastic air deflector (true purpose unknown) but it's held in only by expanding plastic rivets, which can be easily dealt with.
Once removed, it's a simple job to get on with removing the three bolts to drop the cage. Before doing that though I made sure I marked the location of the cage using a permanent marker.
In my case the three bolts came out easily (others have reported bolts shearing off
Leaving this
I had trouble getting the arm low enough, but by removing the rear damper bolt, levering the arm down with the screwdriver in the picture and wedging with some blocks of wood I got it where it needed to be.
So time to get the old bushing out. I had already bought a removal tool from eBay and while this is optional, it has made the job so much easier. I assembled the tool in the correct orientation and got my cordless impact driver with a deep 19mm socket in on the action.
Ready to go
Two minutes later
You could do it using a hand ratchet, but if you have the tools why not use them I say. At this point the old busing is within the black section of the tool. Once removed, a quick visual inspection shows that it's not in bad shape and is date marked 2002. The ones I am fitting are date marked 2011, so I'm confident these bushes have been changed before since my car is a late 2000 build. This probably explains the bolts being easy to undo. Anyway, old bushing looks like this:
And the bushing carrier looks like this, once cleaned up with some emery paper
As mentioned, the OEM bushes come with all new bolts, so here's what you get per side for your £44 or so.
No point hanging around, so I put copper slip in the bushing carrier and on the outside of the bushing,
Then I reconfigure the tool for installation, and get the impact driver on it again.
A few minutes later, it's all in. This one went straight in, but the otherside went in lopsided initially, so I had to back it out and try again
So now it's a case of re-installing everything and lining it all up. One issue with dropping the arm this low is that the spring unseats, so you have to make sure that's in the right place when you get things back together.
It's a bit of a hassle lining it all up as you are lying in your back holding the arm (and all the brakes etc) while trying to tighten some bolts. But a little patience and it was all back together
I then have the job of jacking the car up, removing the stands and gently lowering the car down, which I hate, but it goes without a problem.
Final thing to do was to torque the lower damper bolts with the car back on the ground (so as to ensure the correct preload apparently).
Next step is the full alignment that's already booked in for next week, but I took it for a quick 5 mile journey and already things feel much more composed. I've tried my best to keep the settings right, but I won't be driving it until the alignment is done, so as to not accelerate any tyre wear.
So that's it for all things mechanical ( I hope) leaving me to concentrate on tidying up the bodywork and the wheels. Thanks for reading.
Cheers
James
Last edited by James_G on Mon Jan 18, 2021 6:05 pm, edited 3 times in total.
Currently:
1992 Alpina B2.5 #026, Lagoon Green with Parchment Cloth
Previously:
2013 BMW M135i 3dr, Mineral Grey with Red Leather
2001 Alpina B3 3.3 Coupe #170, Orient Blue with Grey Leather
2006 Z4MC, Silver Grey with Red Leather
2001 E46 330i Sport, Silver with Red Leather
1997 E36 323i SE Touring, Calypso Red with Grey Cloth
1992 Alpina B2.5 #026, Lagoon Green with Parchment Cloth
Previously:
2013 BMW M135i 3dr, Mineral Grey with Red Leather
2001 Alpina B3 3.3 Coupe #170, Orient Blue with Grey Leather
2006 Z4MC, Silver Grey with Red Leather
2001 E46 330i Sport, Silver with Red Leather
1997 E36 323i SE Touring, Calypso Red with Grey Cloth


Doing a great job James, im really enjoying this thread.
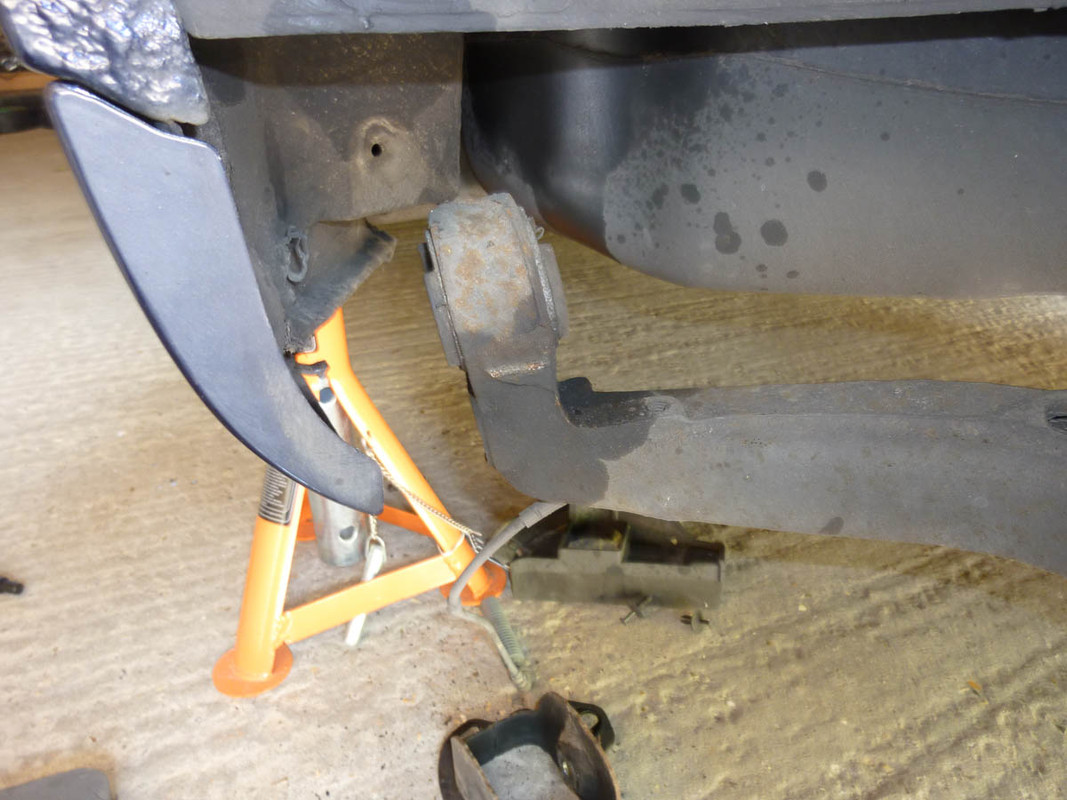
Looking at the 3rd to last pic, it may have been a good idea to clean up the brake pipe while in there, one thing E46s are known for is corroded brake pipes failing an MOT especially on the drivers rear , which involves fuel tank and trailing arm removal to replace
Looking at the 3rd to last pic, it may have been a good idea to clean up the brake pipe while in there, one thing E46s are known for is corroded brake pipes failing an MOT especially on the drivers rear , which involves fuel tank and trailing arm removal to replace
ESTORIL BLUE B3 3.3 COUPE #60 of 90
& the last 1 registered in 2000

The lack of L.S.D keeps me on the straight and narrow
ALPINA......Because Gentlemen don't drift
& the last 1 registered in 2000

The lack of L.S.D keeps me on the straight and narrow
ALPINA......Because Gentlemen don't drift
Glad you're enjoying it and a good suggestion on the brake pipes, especially as somebody else had mentioned theirs failed on this just recently. Presumably it's a case of light wire brushing and coating of waxoyl?drewjak wrote:Doing a great job James, im really enjoying this thread.
Looking at the 3rd to last pic, it may have been a good idea to clean up the brake pipe while in there, one thing E46s are known for is corroded brake pipes failing an MOT especially on the drivers rear , which involves fuel tank and trailing arm removal to replace
Thanks - it's an interesting learning process for me, plus I've never kept any kind of blog/record of work before. Looking forward to just driving it now though!Hodge wrote:Very nice James, quite fascinating
Cheers
Currently:
1992 Alpina B2.5 #026, Lagoon Green with Parchment Cloth
Previously:
2013 BMW M135i 3dr, Mineral Grey with Red Leather
2001 Alpina B3 3.3 Coupe #170, Orient Blue with Grey Leather
2006 Z4MC, Silver Grey with Red Leather
2001 E46 330i Sport, Silver with Red Leather
1997 E36 323i SE Touring, Calypso Red with Grey Cloth
1992 Alpina B2.5 #026, Lagoon Green with Parchment Cloth
Previously:
2013 BMW M135i 3dr, Mineral Grey with Red Leather
2001 Alpina B3 3.3 Coupe #170, Orient Blue with Grey Leather
2006 Z4MC, Silver Grey with Red Leather
2001 E46 330i Sport, Silver with Red Leather
1997 E36 323i SE Touring, Calypso Red with Grey Cloth
So last Saturday saw me at Station View Garage in Dorking to have the car aligned on their Hunter machine.
Up she goes in the air and the various bits are attached
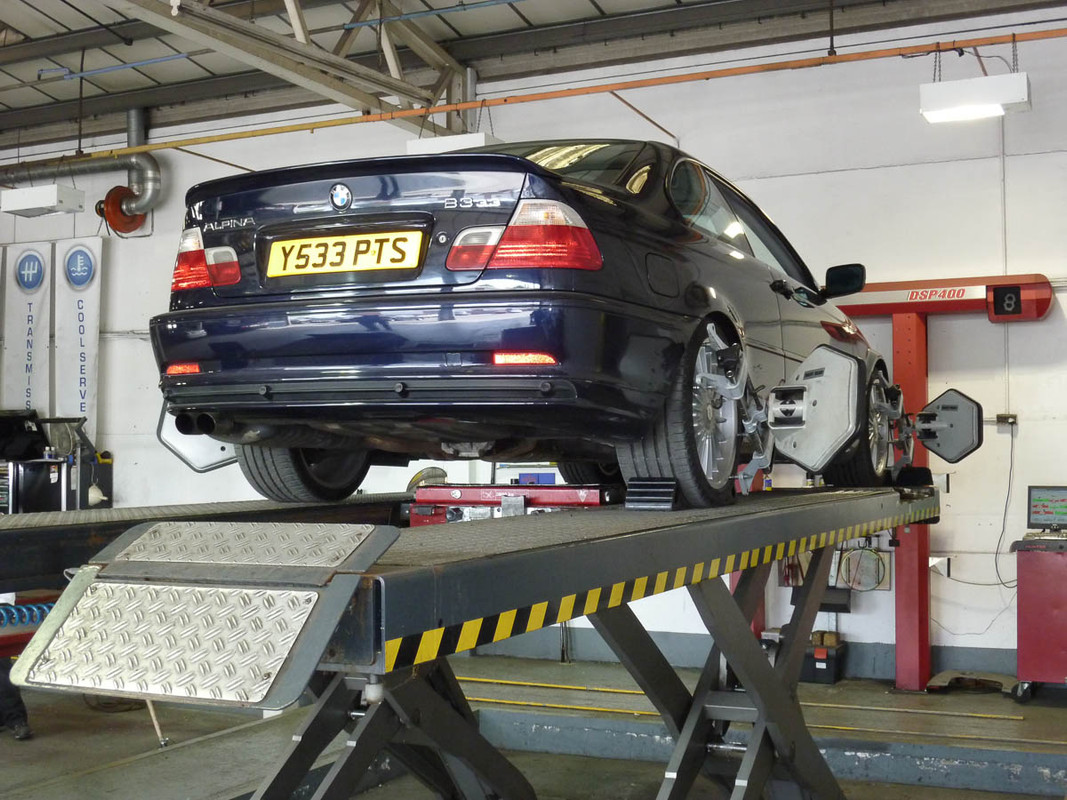
When the initial readings are taken I am pleased to see that I managed to keep everything relatively close to neutral during all the work, but there are still adjustments to be made. No problems with the rear, but to get the front camber into spec requires the removal of the locating pins in the strut tops, so I give the nod that I'm happy and off they go. Alas no caster adjustment on these BMWs but 45 minutes later and the rest is all done. Here's the print out of the before and after.

While waiting I had some time to kill and spotted their certificate of calibration from Hunter which is nice to see

Once done and back on the road the difference is staggering. The car tracks true, feels less jittery like the dampers can now do their work and it coasts much more freely. All in all £87 well spent.
Interestingly the 2 degrees of camber at the rear shows up quite noticeably as this picture shows

I have seen one comment online that 2 degrees of camber is too aggressive and that 1 degree, 35 minutes is a better compromise. Not sure what the pros and cons are of one over the over, but 2 degrees is the spec Alpina have given so I'll run with it for now.
So what's next? Well, I really want to get the bodywork up to scratch and have the small bit of rust on the front wing sorted and the wheel centres. However a few mechanical jobs have cropped up which are:
1. There's now a slightly rattle from the steering as if the top of the steering rack is loose. I've seen others have replaced this section, so will investigate.
2. My gearbox shifts cleanly but my torque converter seems to have had better days and I get the cattle grid noise, albeit infrequently. Warrants further investigation, but I'm dreading the bill whatever it is.
Up she goes in the air and the various bits are attached
When the initial readings are taken I am pleased to see that I managed to keep everything relatively close to neutral during all the work, but there are still adjustments to be made. No problems with the rear, but to get the front camber into spec requires the removal of the locating pins in the strut tops, so I give the nod that I'm happy and off they go. Alas no caster adjustment on these BMWs but 45 minutes later and the rest is all done. Here's the print out of the before and after.
While waiting I had some time to kill and spotted their certificate of calibration from Hunter which is nice to see
Once done and back on the road the difference is staggering. The car tracks true, feels less jittery like the dampers can now do their work and it coasts much more freely. All in all £87 well spent.
Interestingly the 2 degrees of camber at the rear shows up quite noticeably as this picture shows
I have seen one comment online that 2 degrees of camber is too aggressive and that 1 degree, 35 minutes is a better compromise. Not sure what the pros and cons are of one over the over, but 2 degrees is the spec Alpina have given so I'll run with it for now.
So what's next? Well, I really want to get the bodywork up to scratch and have the small bit of rust on the front wing sorted and the wheel centres. However a few mechanical jobs have cropped up which are:
1. There's now a slightly rattle from the steering as if the top of the steering rack is loose. I've seen others have replaced this section, so will investigate.
2. My gearbox shifts cleanly but my torque converter seems to have had better days and I get the cattle grid noise, albeit infrequently. Warrants further investigation, but I'm dreading the bill whatever it is.
Last edited by James_G on Mon Jan 18, 2021 1:06 pm, edited 1 time in total.
Currently:
1992 Alpina B2.5 #026, Lagoon Green with Parchment Cloth
Previously:
2013 BMW M135i 3dr, Mineral Grey with Red Leather
2001 Alpina B3 3.3 Coupe #170, Orient Blue with Grey Leather
2006 Z4MC, Silver Grey with Red Leather
2001 E46 330i Sport, Silver with Red Leather
1997 E36 323i SE Touring, Calypso Red with Grey Cloth
1992 Alpina B2.5 #026, Lagoon Green with Parchment Cloth
Previously:
2013 BMW M135i 3dr, Mineral Grey with Red Leather
2001 Alpina B3 3.3 Coupe #170, Orient Blue with Grey Leather
2006 Z4MC, Silver Grey with Red Leather
2001 E46 330i Sport, Silver with Red Leather
1997 E36 323i SE Touring, Calypso Red with Grey Cloth


It doesn't have to be as bad as you first think. However, I am now on my third, with the first replaced under warranty at about 80k miles and second replaced at 190k in the gearbox rebuild.James_G wrote:My gearbox shifts cleanly but my torque converter seems to have had better days and I get the cattle grid noise, albeit infrequently. Warrants further investigation, but I'm dreading the bill whatever it is.
When I had my gearbox rebuilt, the chaps suggested that they could take a standard 330i TC and rework it to ALPINA spec in terms of vanes and angles and the suchlike.
Big difference between £250 and £1000+, but no apparent difference in performance.
When you are ready, drop me a line and I'll put you in touch.
Charles
Teacher of Chemistry and driver of ALPINAs - not necessarily in that order
B3S Touring (49/116) - been to the moon and now on the way back!
Renault Grand Espace - not mine but the wife's!
Teacher of Chemistry and driver of ALPINAs - not necessarily in that order
B3S Touring (49/116) - been to the moon and now on the way back!
Renault Grand Espace - not mine but the wife's!
Thanks Charles. I'm going to do another 1k miles and assess the situation. I suspect I'll be in touch!Charles wrote:It doesn't have to be as bad as you first think. However, I am now on my third, with the first replaced under warranty at about 80k miles and second replaced at 190k in the gearbox rebuild.James_G wrote:My gearbox shifts cleanly but my torque converter seems to have had better days and I get the cattle grid noise, albeit infrequently. Warrants further investigation, but I'm dreading the bill whatever it is.
When I had my gearbox rebuilt, the chaps suggested that they could take a standard 330i TC and rework it to ALPINA spec in terms of vanes and angles and the suchlike.
Big difference between £250 and £1000+, but no apparent difference in performance.
When you are ready, drop me a line and I'll put you in touch.
Currently:
1992 Alpina B2.5 #026, Lagoon Green with Parchment Cloth
Previously:
2013 BMW M135i 3dr, Mineral Grey with Red Leather
2001 Alpina B3 3.3 Coupe #170, Orient Blue with Grey Leather
2006 Z4MC, Silver Grey with Red Leather
2001 E46 330i Sport, Silver with Red Leather
1997 E36 323i SE Touring, Calypso Red with Grey Cloth
1992 Alpina B2.5 #026, Lagoon Green with Parchment Cloth
Previously:
2013 BMW M135i 3dr, Mineral Grey with Red Leather
2001 Alpina B3 3.3 Coupe #170, Orient Blue with Grey Leather
2006 Z4MC, Silver Grey with Red Leather
2001 E46 330i Sport, Silver with Red Leather
1997 E36 323i SE Touring, Calypso Red with Grey Cloth
So, some of you may have read that the car will be up for sale very shortly, so having taken photos of recent progress I feel I need to bring this thread up to date.
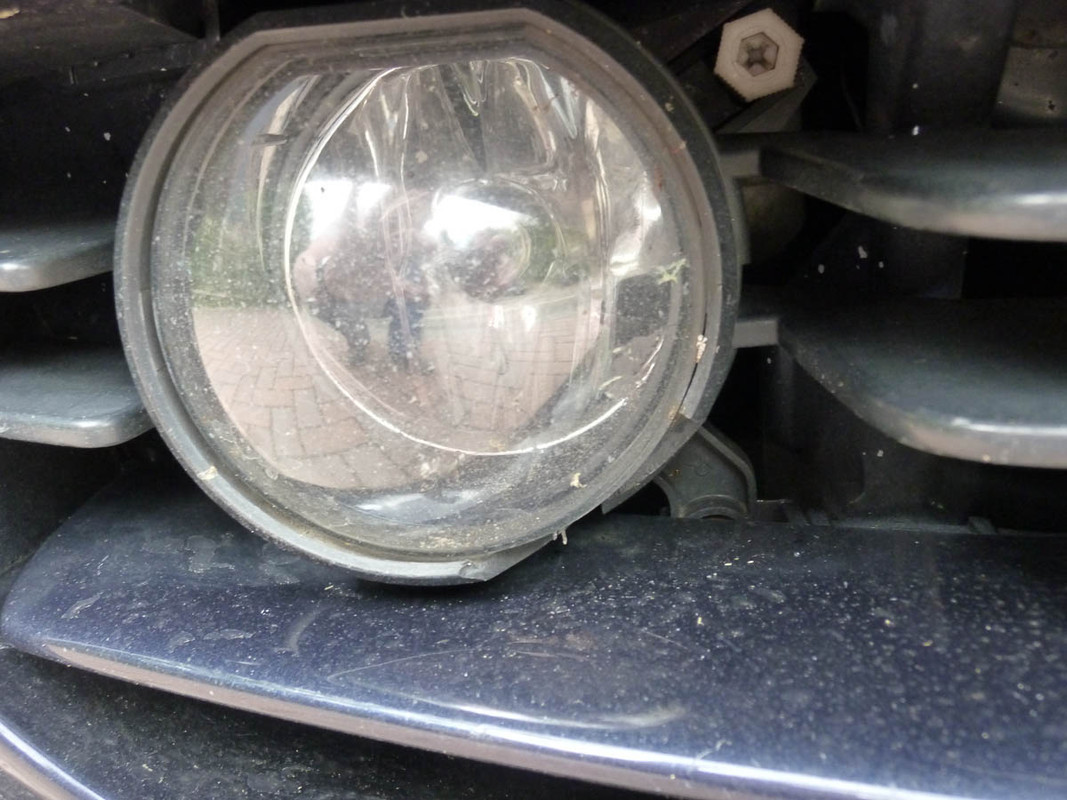
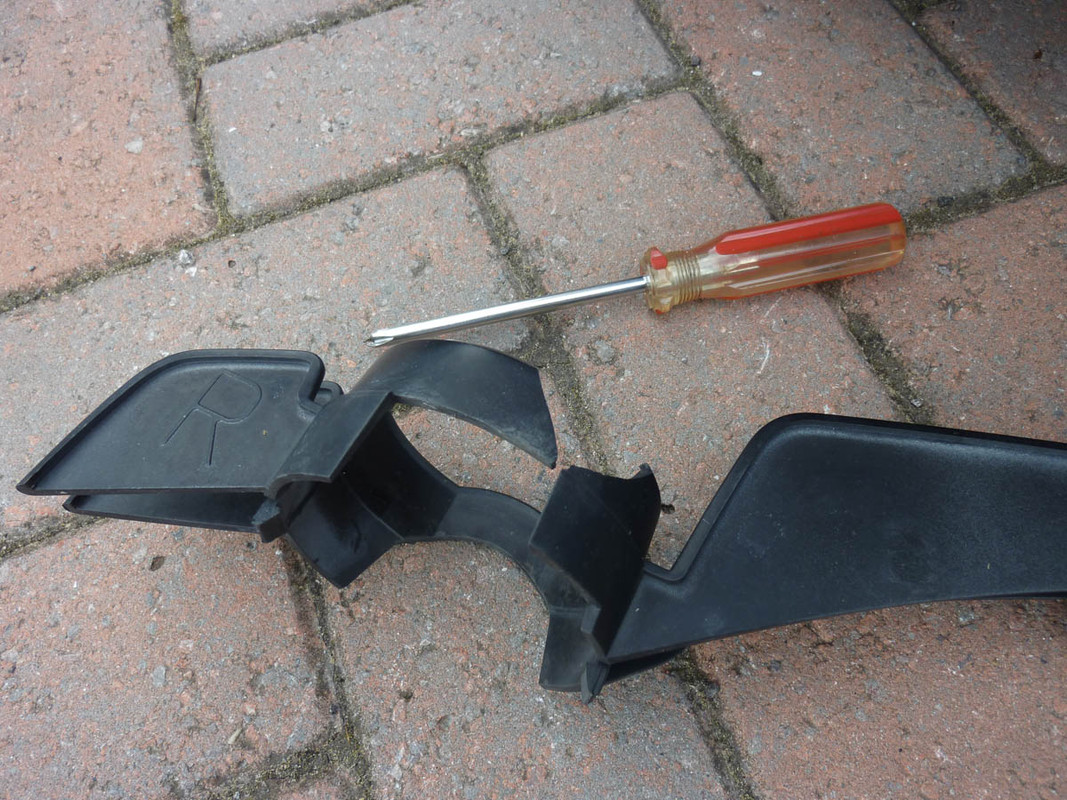
I'd noticed that the foglight surrounds were cracked when I bought the car originally.

Those who've been reading from the beginning will also know that my numberplates didn't match.

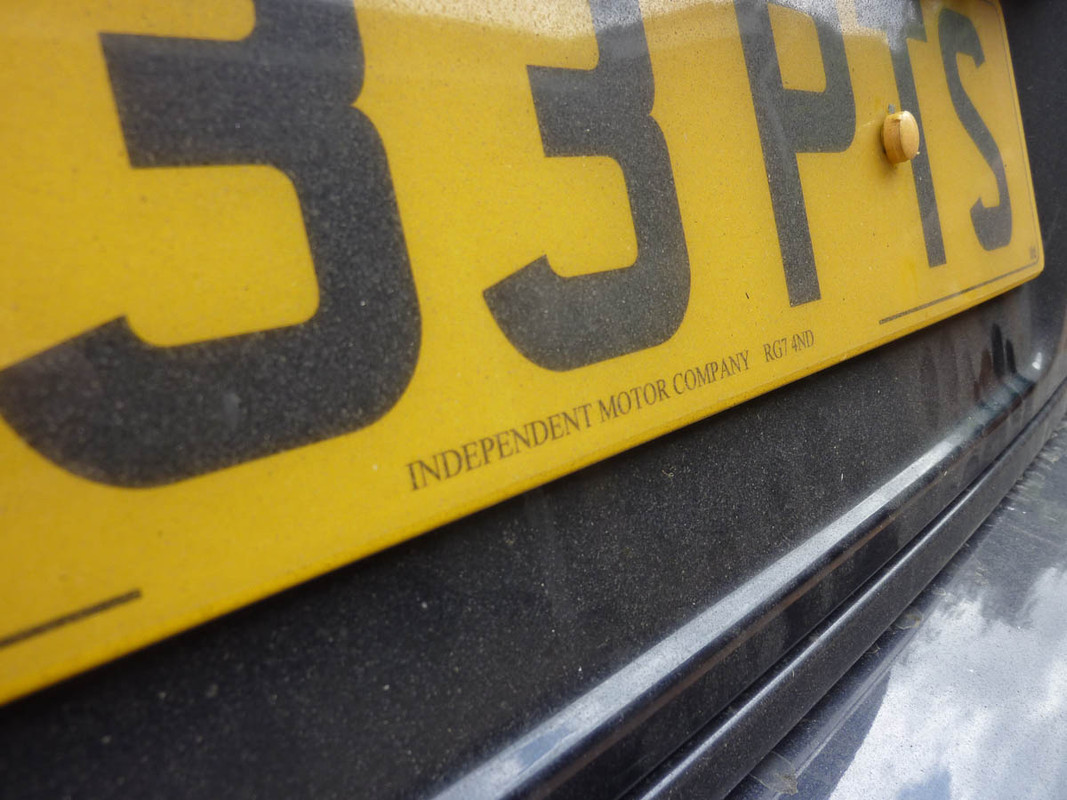
As an aside I emailed "The Independent Motor Company" to see if they'd sold it in the past but never heard back.
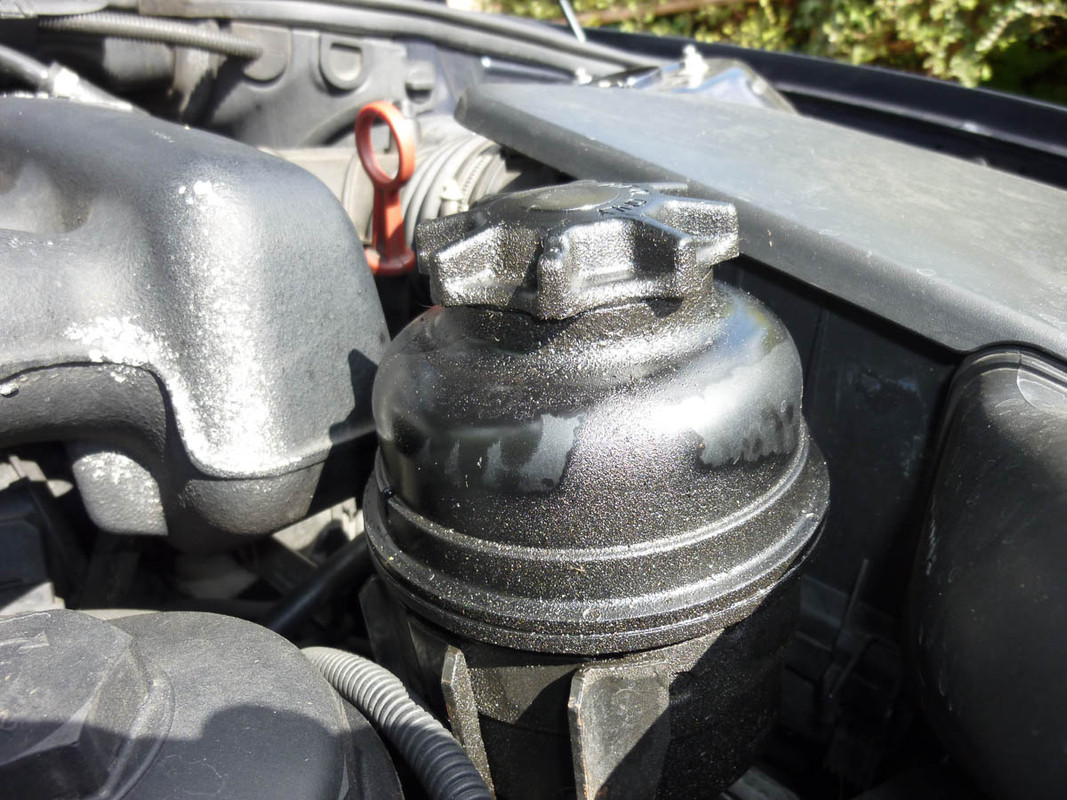
And finally I was suffering with a gentle weep from the PAS fluid reservoir
So a trip to Dick Lovett BMW in Hungerford (as part of a bigger trip elsewhere) sees me collect this little lot.

And then about four weeks ago I got time to get them fitted. First up was removal of the foglight surrounds. Very simple and a few moments and they're off. If any of you are planning the same then they just pull out with a bit of a wiggle.


New reservoir seal going on. The old one looked fine but was about half the thickness, so presumably had got squashed with age.

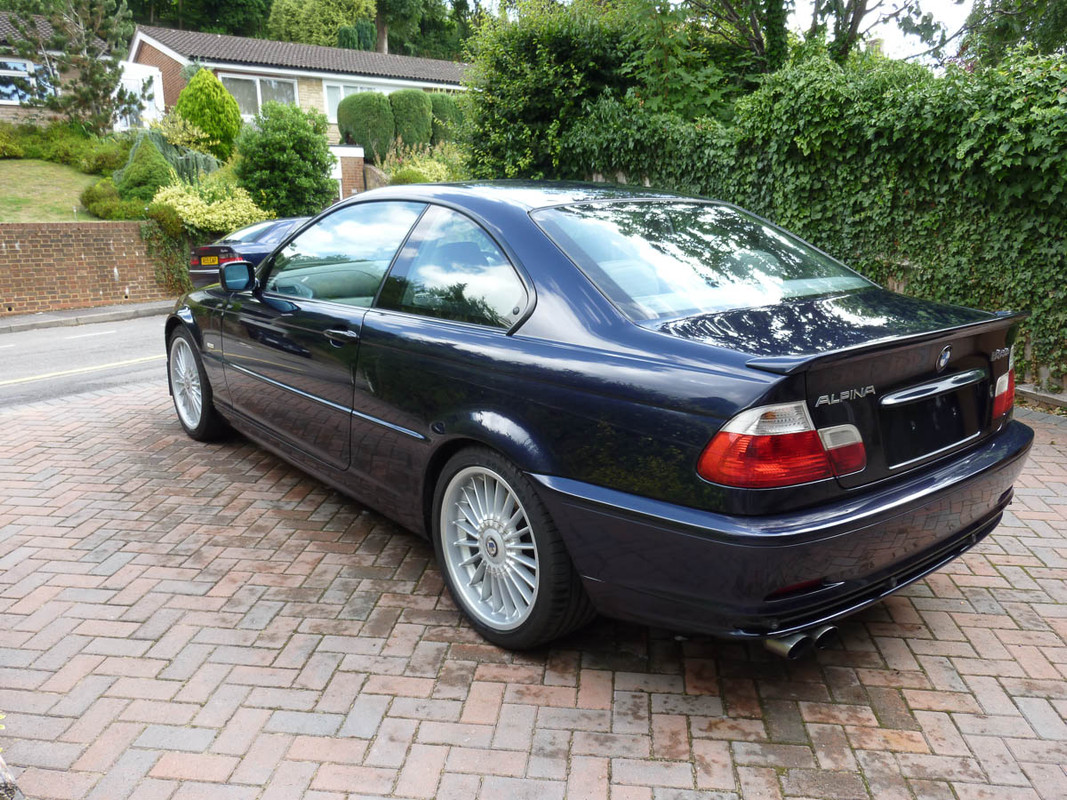
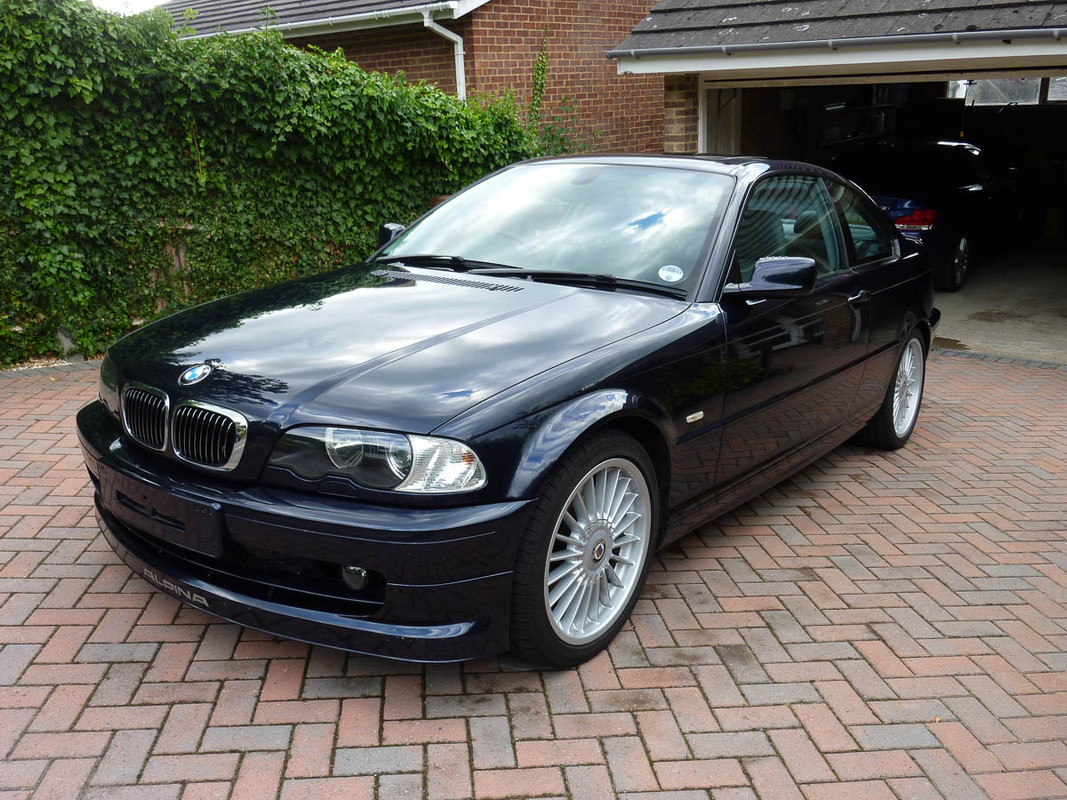
So with the car looking like this I thought it time to give it a good clean

Wheels first

A little bit of tar removal, which is a surprise given the deep clean they got only a few weeks before

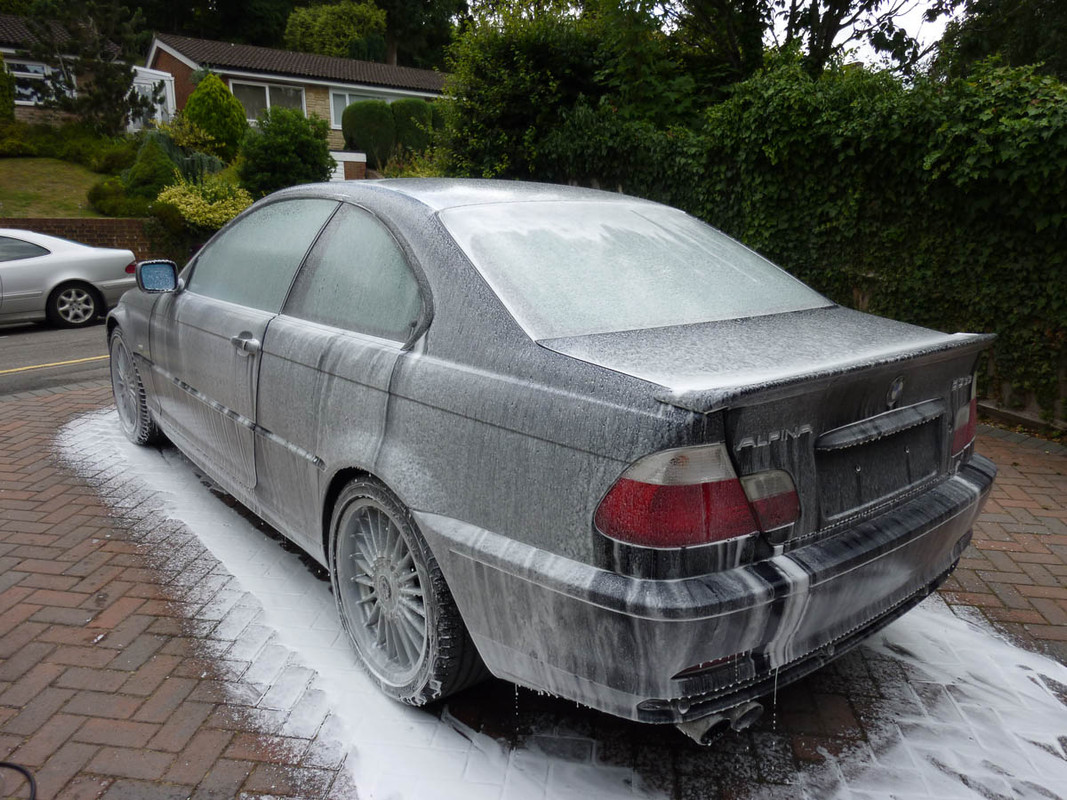
Usual snow foam shot, but does help to remove the looser dirt for those who might be sceptical
Two bucket method used, of course.

Washed, rinsed and dried
Clayed, which lifted some contamination as you can see

And ready to receive a cost of wax. Amazing the effect of claying has to the quality of the finish.


Alas I was called away at this point and when I got back to it I was running out of light, so wax was applied in the garage, meaning no further photos unfortunately. Really nice to have got these few jobs done though, and the car is looking a lot smarter as a result. Seems a real shame to sell it after this work - am I crazy I ask myself??
I'd noticed that the foglight surrounds were cracked when I bought the car originally.
Those who've been reading from the beginning will also know that my numberplates didn't match.
As an aside I emailed "The Independent Motor Company" to see if they'd sold it in the past but never heard back.
And finally I was suffering with a gentle weep from the PAS fluid reservoir
So a trip to Dick Lovett BMW in Hungerford (as part of a bigger trip elsewhere) sees me collect this little lot.
And then about four weeks ago I got time to get them fitted. First up was removal of the foglight surrounds. Very simple and a few moments and they're off. If any of you are planning the same then they just pull out with a bit of a wiggle.
New reservoir seal going on. The old one looked fine but was about half the thickness, so presumably had got squashed with age.
So with the car looking like this I thought it time to give it a good clean
Wheels first
A little bit of tar removal, which is a surprise given the deep clean they got only a few weeks before
Usual snow foam shot, but does help to remove the looser dirt for those who might be sceptical
Two bucket method used, of course.
Washed, rinsed and dried
Clayed, which lifted some contamination as you can see
And ready to receive a cost of wax. Amazing the effect of claying has to the quality of the finish.
Alas I was called away at this point and when I got back to it I was running out of light, so wax was applied in the garage, meaning no further photos unfortunately. Really nice to have got these few jobs done though, and the car is looking a lot smarter as a result. Seems a real shame to sell it after this work - am I crazy I ask myself??
Last edited by James_G on Mon Jan 18, 2021 5:03 pm, edited 6 times in total.
Currently:
1992 Alpina B2.5 #026, Lagoon Green with Parchment Cloth
Previously:
2013 BMW M135i 3dr, Mineral Grey with Red Leather
2001 Alpina B3 3.3 Coupe #170, Orient Blue with Grey Leather
2006 Z4MC, Silver Grey with Red Leather
2001 E46 330i Sport, Silver with Red Leather
1997 E36 323i SE Touring, Calypso Red with Grey Cloth
1992 Alpina B2.5 #026, Lagoon Green with Parchment Cloth
Previously:
2013 BMW M135i 3dr, Mineral Grey with Red Leather
2001 Alpina B3 3.3 Coupe #170, Orient Blue with Grey Leather
2006 Z4MC, Silver Grey with Red Leather
2001 E46 330i Sport, Silver with Red Leather
1997 E36 323i SE Touring, Calypso Red with Grey Cloth
